Table of contents
Compiling C
In SOCS, we will teach you how to interact with (program) the CPU on the lowest layer of abstraction that it understands: assembly code. Since the jump from higher-level programming languages such as Python or Java to assembly is quite big, we first want you to have a basic understanding of the C language. The C language is a language that has a closer connection to assembly than the higher-level programming languages you may know already.
Running C programs
Programs written in C can not directly be executed. Instead, they have to be compiled first. Compilation is the step of transforming programming code into a language that the CPU understands: assembly. For Java and Python the compilation step is mostly hidden from the developer, and a simple command is enough to execute the code. Thus, to compile C programs, we need to install a set of tools (a compiler) that allows us to transform the C code to assembly. The C code is often referred to as the source code.
Below, we will show you some options of how to work with C from the browser, from Windows, from Linux, and from Mac. For the first few sessions, compiling the C programs in the browser may be sufficient for you, but later we will rely on you having access to a compiler. This is because compiling in the browser does not work with bigger projects, which we will encounter in later exercise sessions.
A simple test program
You can test your compiler setup with the simple hello world example below. Create a file named hello.c and put the following code into it:
#include <stdio.h>

int main(void) {
    printf("Hello world!\n");
    return 0;
}
A step by step explanation of what the code does can be found in Session 1: C & Assembly basics
Compiling C in the browser
The website Godbolt allows you to write C code on the left and visualize the compiled assembly instructions on the right. This is very useful if you just want to see how a C program looks like in assembly. There are several configurations for you to choose from and the most important ones for this course will be:
-
x86-64 gcc 11.2: Assembly for an x86-64 CPU. This will most likely be the architecture that you compile to when you want to run code on your own machine (if you don’t have a newer ARM-based Mac for example). When you use this compiler, you can also see the output of your program by clicking the “Output (0/0)” button at the bottom of the screen. -
RISC-V rv32gc gcc 10.2.0: Assembly for a RISC-V CPU in therv32gcconfiguration. When using godbolt to see how compiled C code looks in RISC-V, you can use this configuration.
Note that these configurations may yield widely different outputs, and you will come to understand in a few weeks why that may be the case. For now, it is sufficient to stick to the two mentioned configurations, but feel free to experiment with other configurations as well.
Compiling C on Windows 10 with Windows Subsystem for Linux (WSL)
Compiling C on Windows can be rather complicated. In the past years, we advised students to install MinGW to compile on Windows. You can still find the instructions for this method at the bottom of this page if the modern approach does not work for you.
A modern approach of working with C in Windows is to use integrated Linux support that is built into Windows, called Windows Subsystem for Linux (WSL). You could think of WSL as installing a Linux virtual machine on top of your Windows installation. There are good websites on how to enable and install WSL, for example the official documentation by Microsoft. In essence, you only need to:
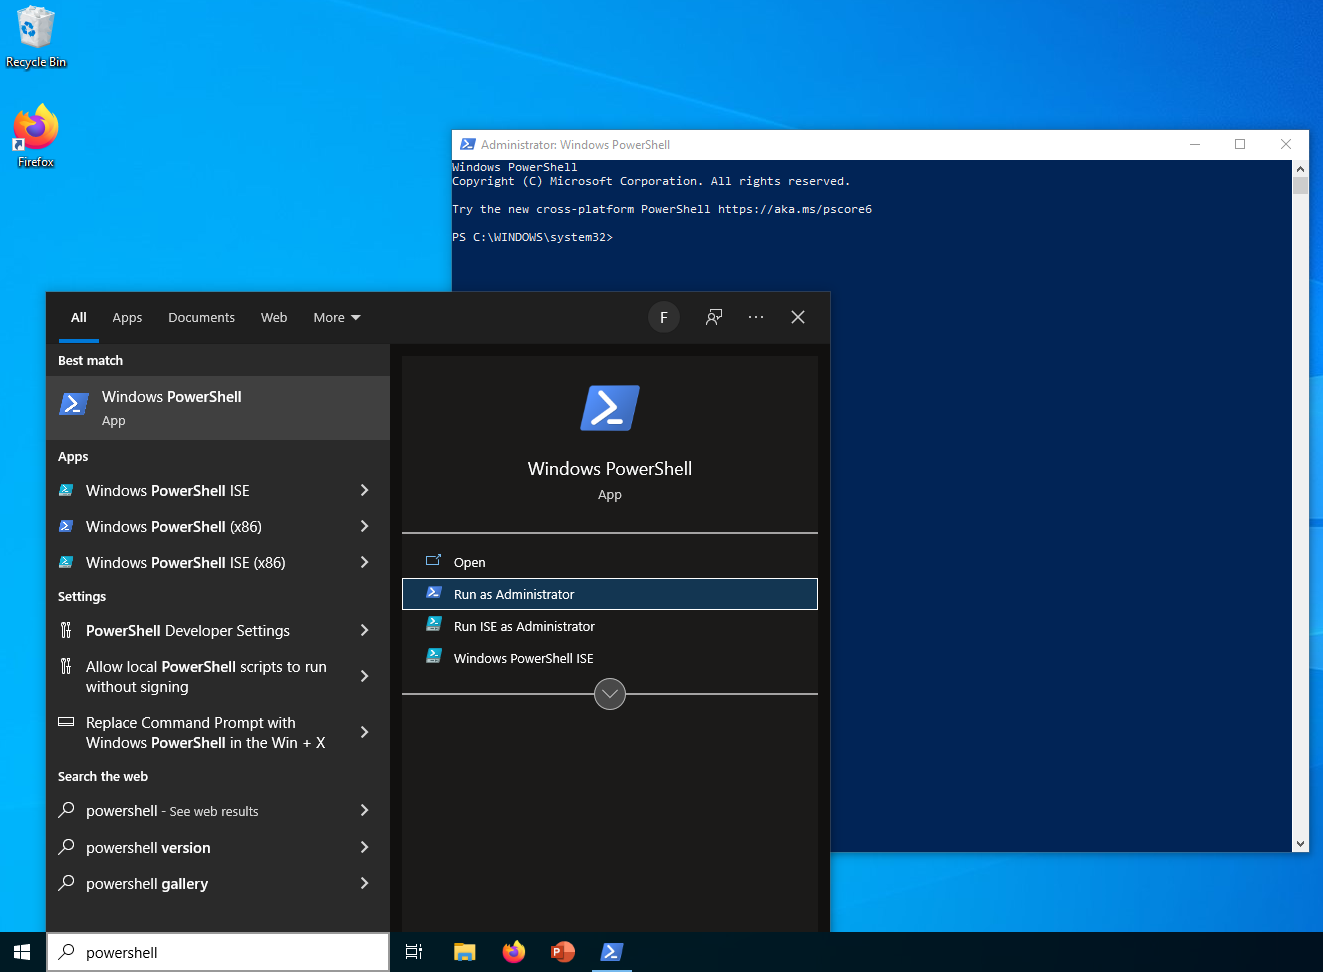
- Open a PowerShell Window as administrator (see screenshot below how to do this if you are not sure).
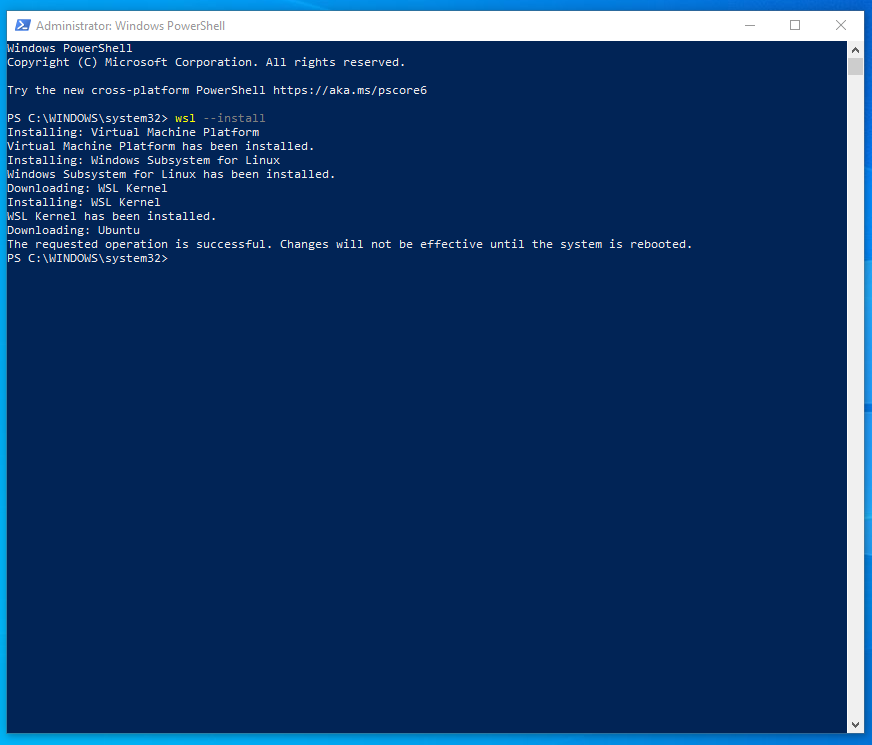
- Run the command
wsl --install - Restart Windows (may take a minute)
- After restarting, you should see an open terminal where Ubuntu is currently being installed. Ubuntu is the default Linux distribution recommended for WSL and there is no reason to change. If this installation fails for some reason, you can always restart it in an administrator Powershell with the command
wsl --install -d Ubuntu- If for some reason there is an error, one first solution could be to change the WSL version to 1 (default is 2). Do this with the command
wsl --set-default-version 1.
- If for some reason there is an error, one first solution could be to change the WSL version to 1 (default is 2). Do this with the command
- During installation, you will be asked for a username and password. While this choice is usually important, this installation is just a virtual machine on your Windows machine. Thus, security is not necessarily a big concern anymore. Feel free to choose a simple username/password combination like
ubuntufor both username and password. - If the Ubuntu window is not already open, you can now always start it by searching for and opening the
Ubuntuapp (see screenshot).


At this point, you have a fully functional Ubuntu virtual machine (VM) on your Windows system. While a graphical interface is absent, it is not a requirement for our intended objectives. You can always access the current folder that is open in Ubuntu by executing the command explorer.exe . in the Ubuntu VM. This will open a Windows Explorer window with the folder as it is stored in Ubuntu. You can use this to work on files from Windows and then execute the compiler from the Ubuntu Terminal.
You can edit your .c files in any text editor (like Notepad). However, your default text editor might not be very convenient to write programs, for instance because it does not have syntax highlighting and autocompletion. If you want a lightweight editor with syntax highlightning you can install Notepad++. Other options may include VSCode (notice the Code part), VSCodium (if you prefer open source), Vim…
In Windows, you can access the files stored in your Ubuntu virtual machine and open them in your favorite text editor. You can run
explorer.exe .in the Ubuntu VM to access them, and they should be located inLinux > Ubuntu > home. Note however that it is not as easy to access your windows files from your Ubuntu VM!
Now you are set up with a Linux VM to work with. Keep reading below on how to set up Ubuntu to compile C programs.
Compiling C on Linux
No matter if you already have a Linux distribution running or if you are using WSL, open a new Terminal. In WSL, this is what you already see when you open Ubuntu and log in. On normal Ubuntu or other Linux distro’s, you will have to search for the Terminal program or press CTRL+ALT+T simultaneously.
In the upcoming instructions, each command you need to enter will be preceded by a $ sign. You do not need to manually input this sign; it simply indicates that the following text is a command to be entered. This approach assists us in demonstrating the anticipated output you should observe. As a result, any lines without the initial $ are indicative of the expected output (though there might be additional output not presented here).
This step assumes you are using the apt package manager, which is the default for WSL and bare metal Ubuntu. If you are using another package manager, please refer to other online resources for the correct syntax.
Once you have the terminal open, update the system (or skip this step if you know what you’re doing):
$ sudo apt update && sudo apt upgrade -y
$ sudo apt autoremove -y
This may take a while.
Then, install the gcc compiler package:
$ sudo apt install gcc -y
The following steps are general and apply to all Linux distributions/WSL
After completing this task, you can verify the successful installation of gcc by executing the following command: (Your output may differ slightly.)
$ gcc --version
gcc (Ubuntu 9.3.0-17ubuntu1~20.04) 9.3.0
Copyright (C) 2019 Free Software Foundation, Inc.
This is free software; see the source for copying conditions.  There is NO
warranty; not even for MERCHANTABILITY or FITNESS FOR A PARTICULAR PURPOSE.
Congratulations, you successfully installed a compiler! Let’s now compile the simple hello.c program from above and run it.
If you didn’t do so already, save the contents of the example program above into a file named hello.c. You can do so by either using a graphical interface or by using command line text editors like nano. Doing so in nano is not too difficult and will give you some more experience with using the terminal:
$ nano hello.c
# Here you will now see a window where you can enter code. You can paste text by pressing CTRL+SHIFT+V, or if you're using Windows, also by right clicking into the terminal window.

# After you are done with the changes to the file, you exit nano by pressing CTRL+X and can confirm or deny that the file should be saved by pressing Y or N and confirming with ENTER.
Now, you can compile your program:
$ gcc hello.c -o hello
  # <- This is a comment
  # This statement runs the 'gcc program' with an input of 'hello.c -o hello'
  # -o stands for output
  # So we call the compiler program, with our source code file 'hello.c' and tell it to give us an output file named 'hello'
  # The 'hello' file is our compiled program, sometimes called 'the binary'
We can run this ‘hello’ file/program with the following command:
$ ./hello
Hello world!
If you see the Hello world! output, you are done with the setup! ![]()
Compiling C on Mac
In a Terminal, first check whether the gcc compiler is installed by entering gcc --version.
If gcc is not installed, you can install it, via the Homebrew package manager, with the command brew install gcc. (If you don’t have brew installed, follow the tutorial to install it first.)
Now that you have installed gcc, you can follow the previous section “Compiling C in Linux” (omitting the part about installing gcc) to learn how to compile programs!
Alternative: Compiling C on Windows with MinGW
If you cannot make Windows Subsystem for Linux work or do not have access to Windows 10 AND refuse to use a Virtual Machine or Linux distribution, you may also have success with using MinGW. Please be aware that this description pertains to previous years, and our ability to assist you might be limited if it proves ineffective.
- Get the MinGW installer: https://sourceforge.net/projects/mingw/files/latest/download
- Run this installer
- Install location at C:/MinGW
- Packages to install include at least:
- mingw32-base
- mingw-developer-toolkit
- msys-base
- Add C:/MinGW/bin to your PATH environment variables:
My Computer > Properties > Advanced > Environment Variables > Path
More extended instructions can be found here: http://www.mingw.org/wiki/Getting_Started. You can check if everything is working correctly by:
- Opening
Course Documents -> Exercise sessions - Creating the file
hello-world.cwith the example code at the top - Open a command line
- Use the
cd(change directory) command to go to the folder in which you createdhello-world.c - Execute the following command
gcc hello-world.c -o hello-world - Now, execute the compiled program: simply type
hello-worldand press enter
If the terminal shows Hello world, you are done!